Creating Euclidean Distance Rasters from Vector Inputs
2025 UPDATE: This tool will be deprecated and will be removed in future versions of ArcGIS Pro, replaced by the Distance Accumulation tool. We have a new tutorial forthcoming.
In the meantime, knowing the options and parameters described here will help you use the new tool.
Included in this tutorial:
Accessing and opening the Euclidean Distance tool
Euclidean Distance parameters and options, including the standard inputs, additional output options
Running the tool and examining the results
Software version in examples: ArcGIS Pro 3.0.0
Tutorial Data: The tutorial includes demonstration with sample data available here.
Credits: L. Meisterlin and Varisa Tanti (2022)
This tutorial covers the Euclidean Distance geoprocessing tool (in ArcGIS Pro) that generates a raster dataset with cell values that represent the (straight-line) distance from the center of each raster cell to the nearest input feature.
Related: This tool requires either the Spatial Analyst Extension in ArcGIS Pro. To verify your extensions, see Which Esri Extensions Is My Software Licensed to Use?
Opening the Euclidean Distance Tool
You can access the Euclidean Distance tool by clicking the Geoprocessing toolbox in the main ribbon, and clicking through Spatial Analysis Tools > Distance > Legacy > Euclidean Distance. You can also search for “Euclidean Distance” in the search bar.

accessing the Euclidean Distance tool
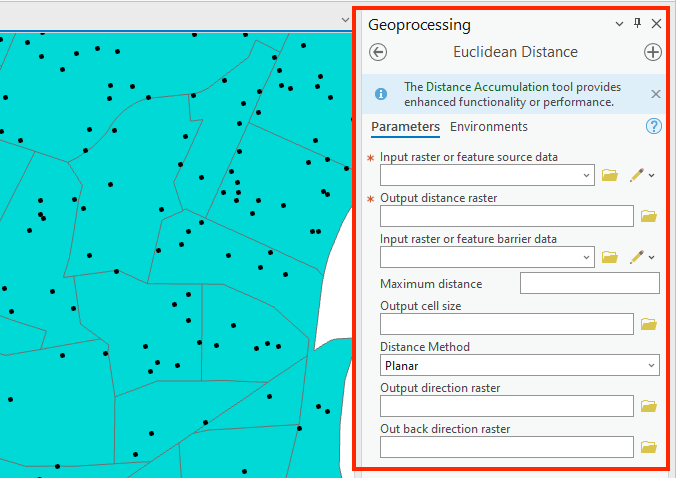
Euclidean Distance Parameters & Options
In the Euclidean Distance dialogue box, you will see these fields: input raster or feature source data, output distance raster, input raster of feature barrier data, maximum distance, output cell size, distance method, output direction raster, and out back direction raster.
the inputs for running the Euclidean Distance geoprocessing tool
The Standard Inputs
Here’s a brief description and explanation of the different inputs:
Input raster or feature source data: Specify the layer as your input feature data. The options that appear in the drop-down menu will be the layers currently in your map’s Contents. You can also choose to browse for an input file (by clicking the yellow folder icon). In this example, it is the layer with the point features
Output distance raster: Name and indicate the location of the output raster.
Input raster or feature barrier data: This option allows you to define barriers of your output.
Maximum distance: Specify a maximum distance if appropriate for your analysis. Cells farther than this distance from an input feature will not have values calculated in the output raster.
Output cell size: Specify the dimensions of the output rasters’ cells here, in the units of the input layer’s CRS. For example, if you indicate “20” as the output cell size using the Tutorial Data projected in feet, then the cells generated will be 20 feet x 20 feet.
Distance Method: Specify whether the distance will be calculated using a planar or geodesic method. ‘Planar’ indicates a calculation that will be performed on a projected flat plane (2D). ‘Geodesic’ indicates a calculation performed on an ellipsoid.
Additional Output Options
Output direction raster: The tool includes the option to produce a direction raster, as well as a distance raster. The direction raster contains the calculated direction, in degrees, that each cell center is from the closest input feature. If you want to produce a direction raster, specify a name and location for the output here.
Out back direct raster: The tool also includes the option to produce a back direction raster calculated in degrees to the neighboring cell along the shortest path back to the closest source.
One More Thing: Geoprocessing Extents
If you want or need to limit the geoprocessing extents of your Euclidean distance raster, you can specify the extents for this tool only before executing the tool under the tool’s Environments settings. To set the processing extents for the overall map project see Geoprocessing Extents.
Running the Tool & Examining Results
The resulting Euclidean Distance raster (using the Points1 layer from the sample tutorial data as an input, with a 20-foot cell size) is depicted below as an example. (The screenshot includes the legend within the Contents panel for your reference.)
example Euclidean Distance raster results